Securing an ASP.NET 6 Web App with Azure AD B2C using Authorization Code Flow with PKCE
.NET Core, Azure AD B2C, B2C, Security — Mar 17, 2022

In this blog post we’ll go through all the steps that are required to setup a new Azure AD B2C tenant and register an application that is configured to use the OAuth2 Authorization Code Flow with Proof For Code Exchange (PKCE) or in short Code flow with PKCE. Traditionally the implicit flow has been used most often for non-SPA applications such as an ASP.NET MVC or Razor pages applications, but is now no longer recommended because it is inherently less secure.
Some disadvantages of using Implicit Flow:
- Tokens are delivered via redirects directly in the query url (which makes it easier to intercept)
- Tokens would be available in the browser history
Some Advantages of using Code Flow with PKCE:
- If an authorization code is intercepted it cannot be used to get an access token without the client secret (code_verifier)
This post will focus on the practical steps on how to configure Azure AD B2C to be used with Code flow with PKCE and how we need to configure our ASP.NET Razor Pages, MVC, or Web Api to be able to secure them. Sample code for configuring the various application types is located here.
Overview
- Prerequisites
- Create a new Azure AD B2C Tenant
- Getting an authorization code and using it to get an access token (optional)
- Securing a Razor Pages Application
- Securing a MVC Web Application
- Securing a Web Api
- Troubleshooting
Prerequisites
Make sure that you have an environment setup to run .NET 6 (Core), such as Visual Studio 2022, JetBrains Rider, or just Visual Studio Code with the C# Extension installed.
You will also need an active Microsoft Azure account. A free account is completely fine as Azure B2C is free for up to 50,000 Monthly Active Users. Students can also get a 100$ credit for 12 months by signing up via their university or school account at https://azure.microsoft.com/en-us/free/students
If you’re securing a Web Api I also strongly recommend getting an Api client such as Postman or Insomnia.
Create a new Azure AD B2C Tenant
Search up Azure Active Directory B2C from the azure portal and click on the Create button. On the next page select Create a new Azure AD B2C Tenant.
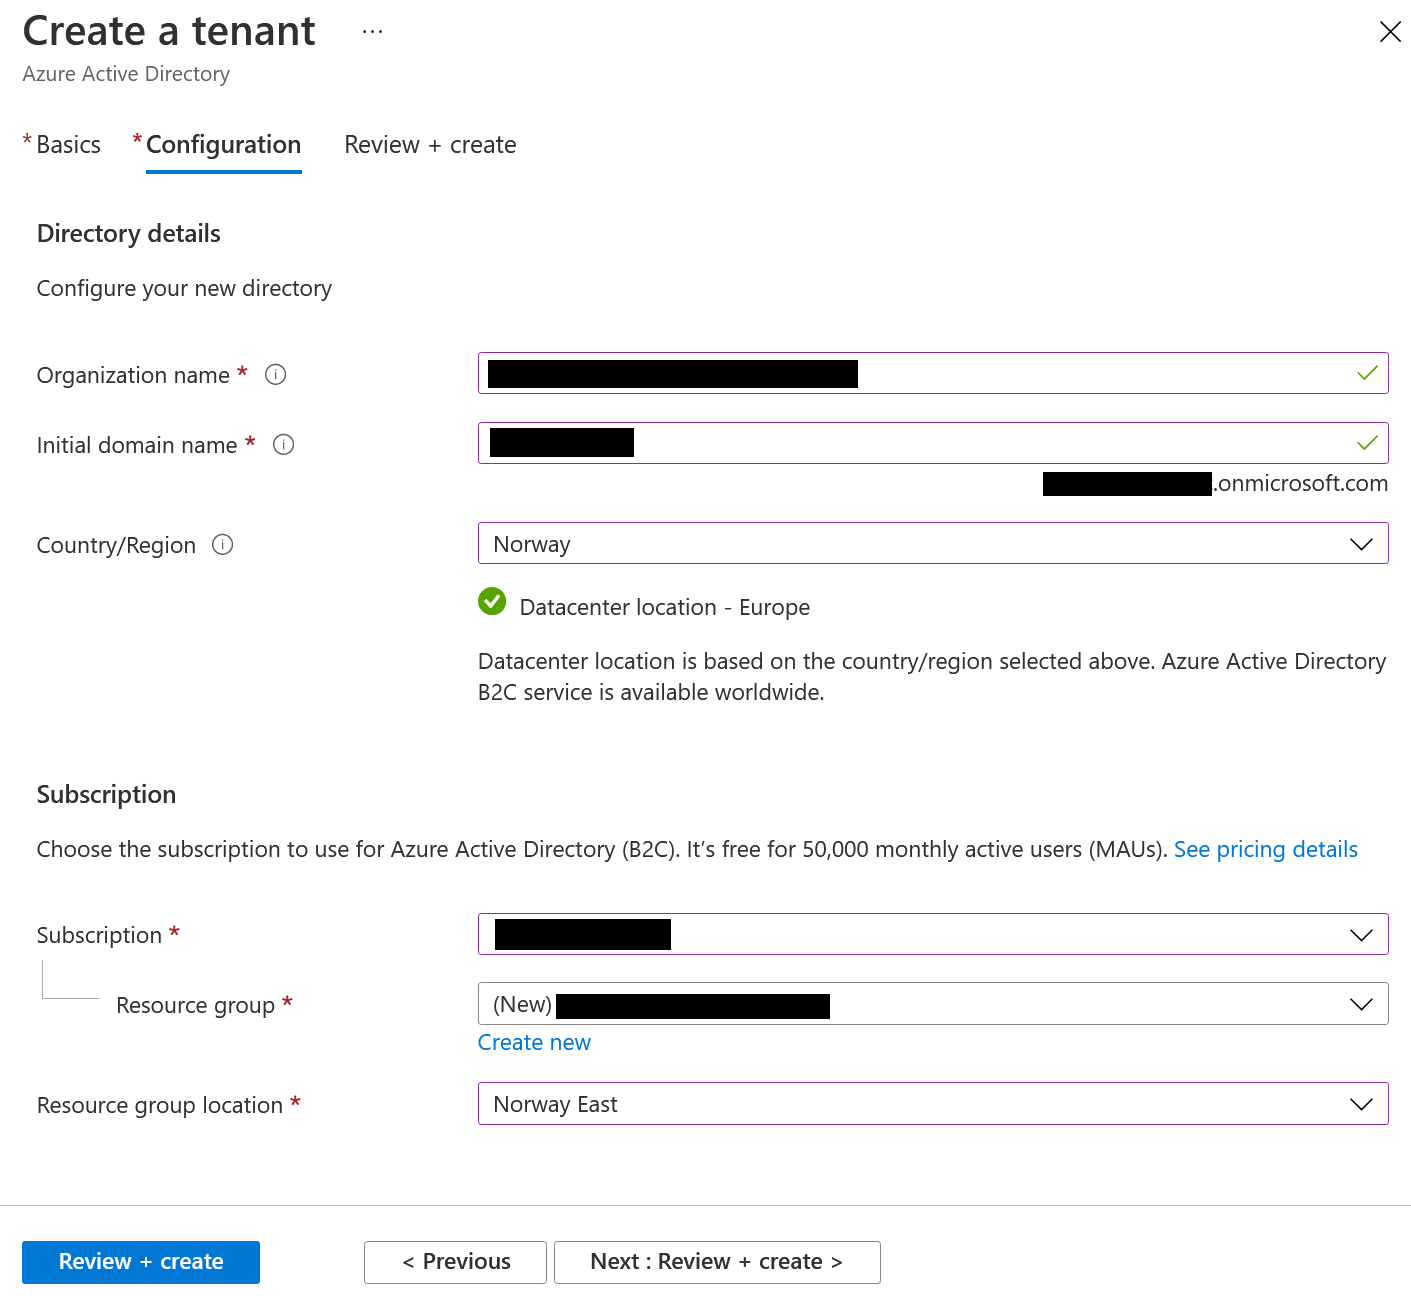
Enter a name organization name and the initial domain name. I’ll refer to this as the tenant domain name, make sure to write it down.
Switching to this new tenant can be done either by clicking on your profile picture and selecting switch directory or by searching up B2C Tenants in the search box.
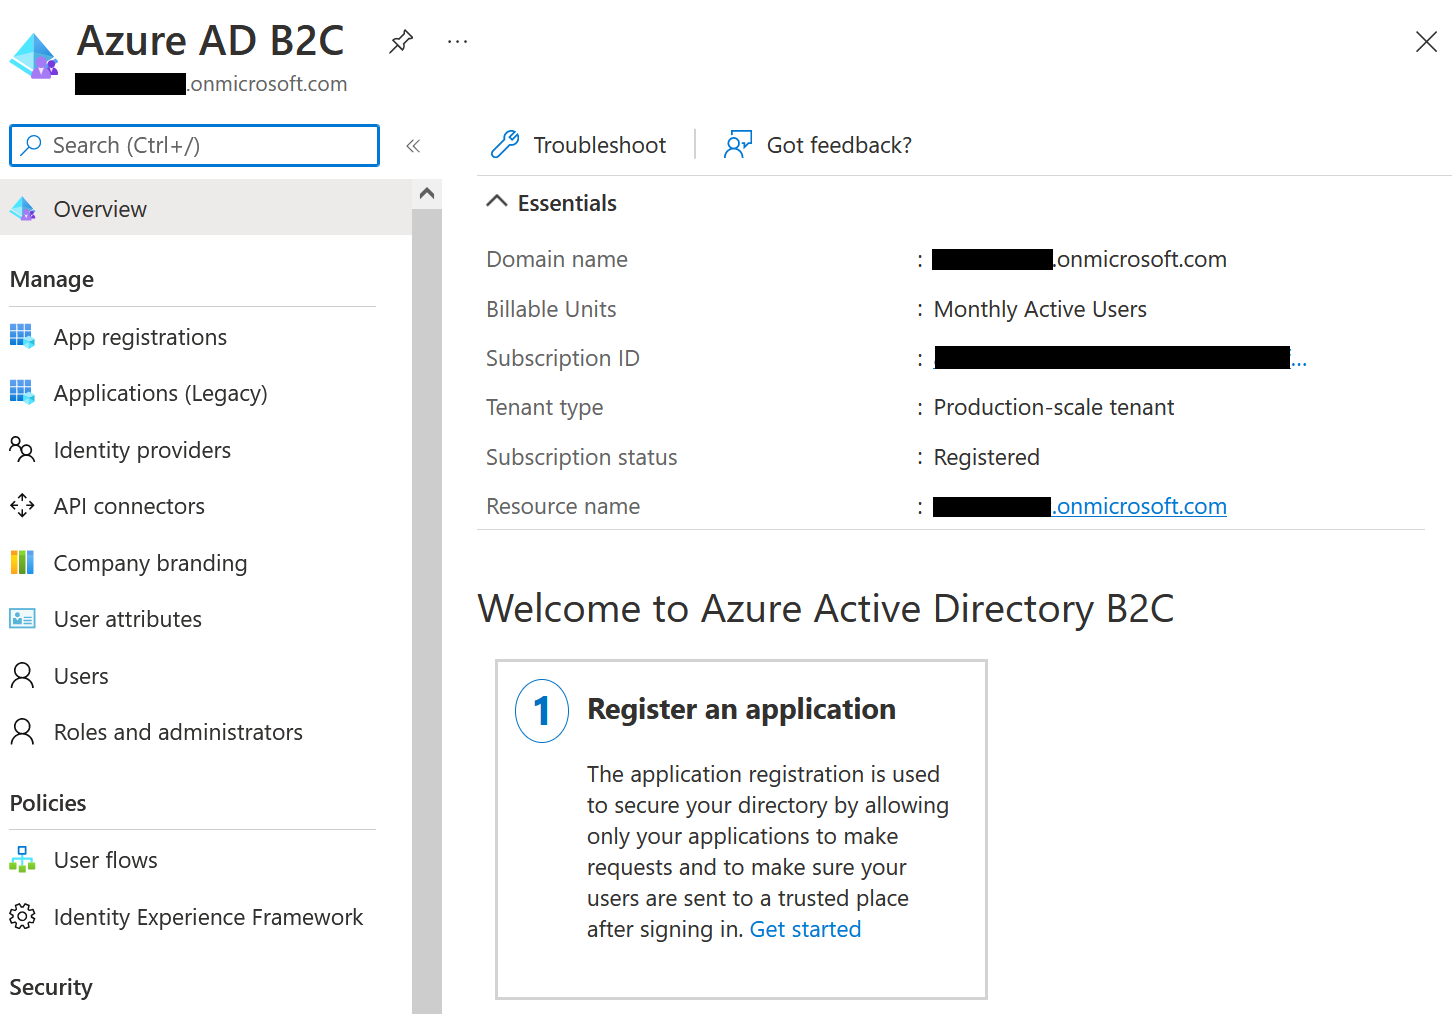
The overview should look something like this. Make sure to write down the tenant id for later. (Domain name)
Registering a new application
To be able to secure an ASP.NET application, be that Razor pages, MVC, or Web Api we need to register an application within B2C.
Enter the name of the new application and make sure the check the third option in the list, otherwise we can’t use user flows for authentication.
Set the redirect url to https://localhost:5001/signin-oidc this is the redirect url used by the Microsoft Identity Platform (not to be confused by IdentityServer4) when using Razor Pages or MVC.
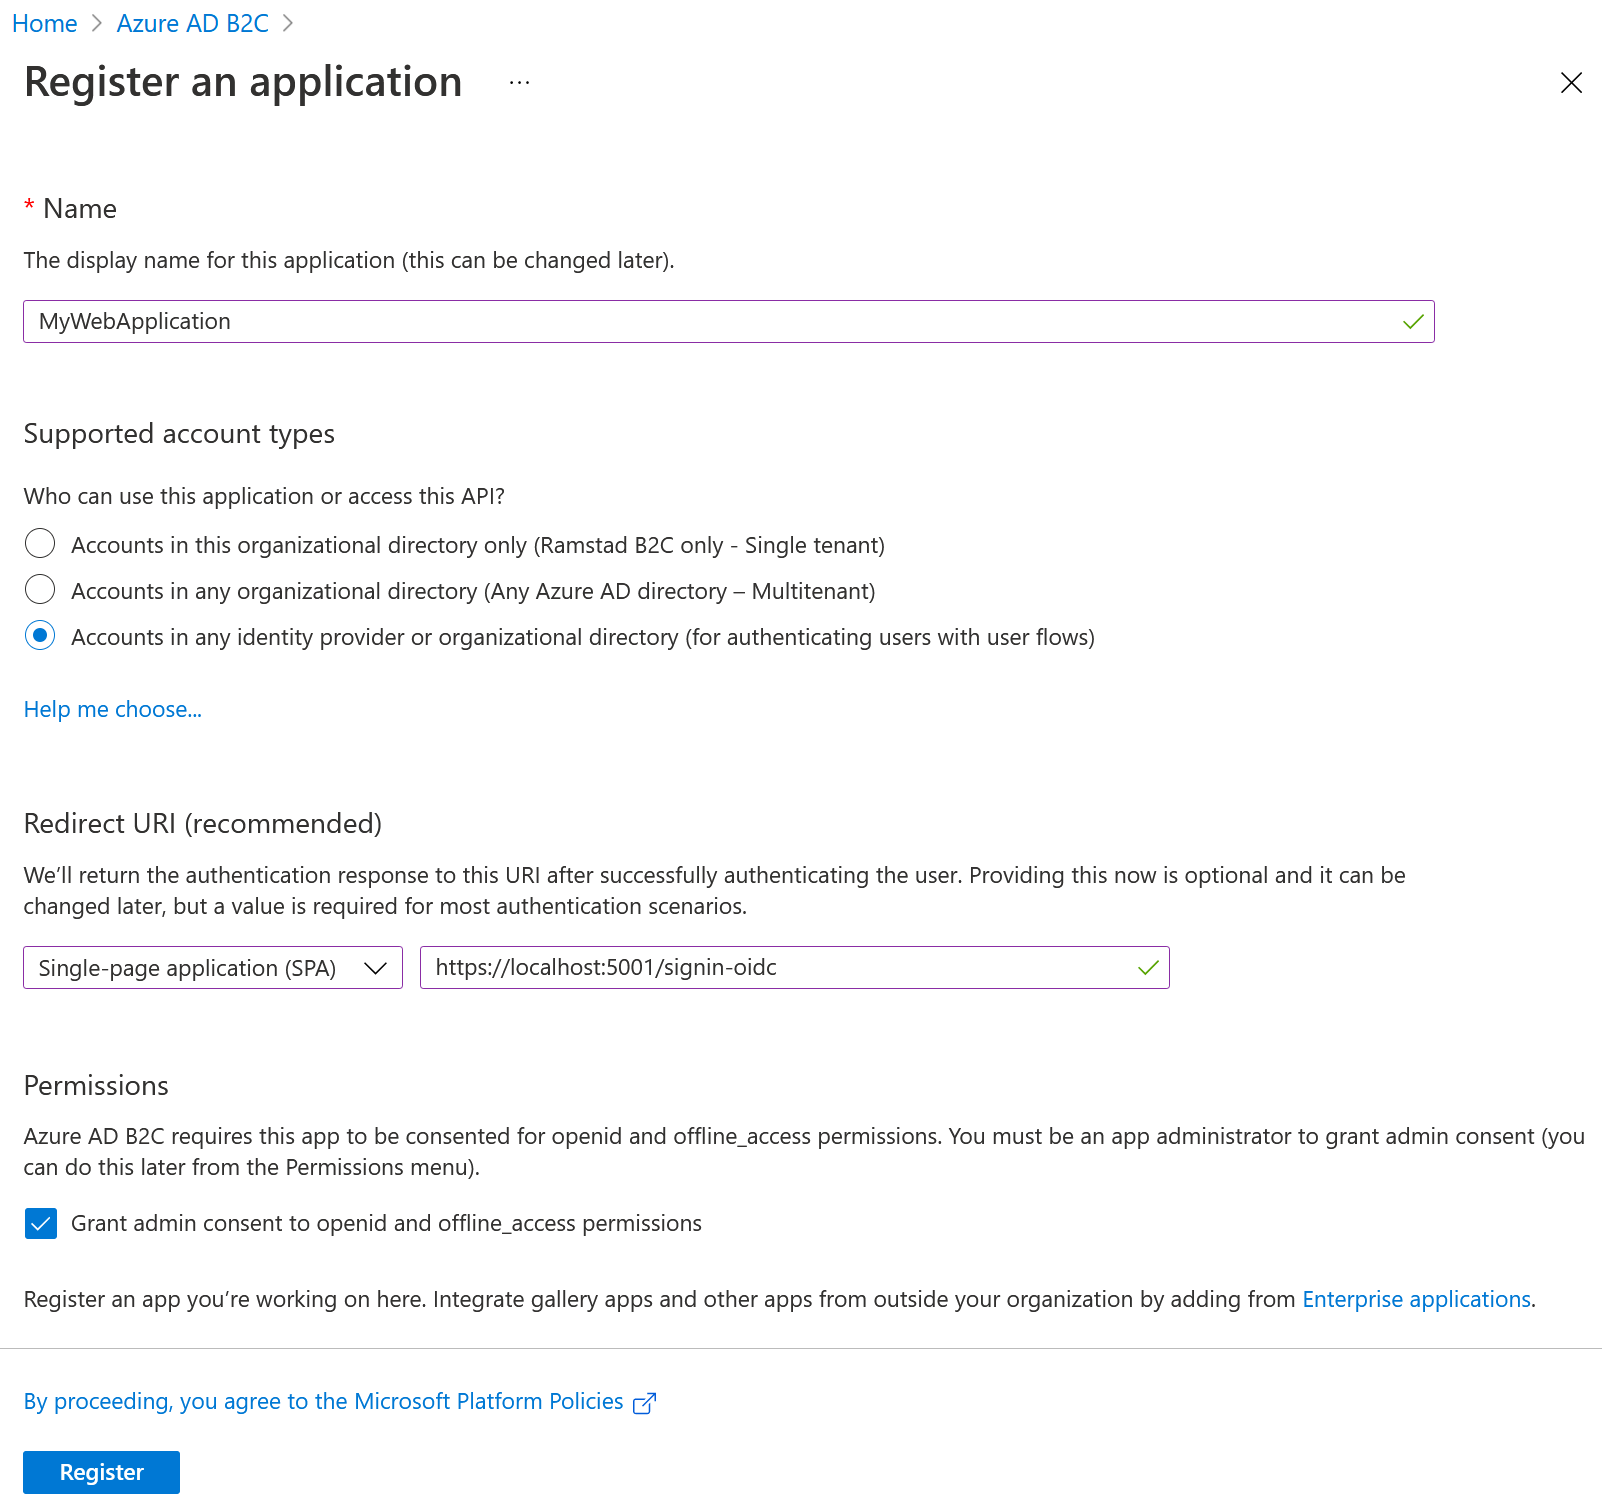
We also want to grant admin consent to openid and offline_access so that users can use openid and refresh tokens.
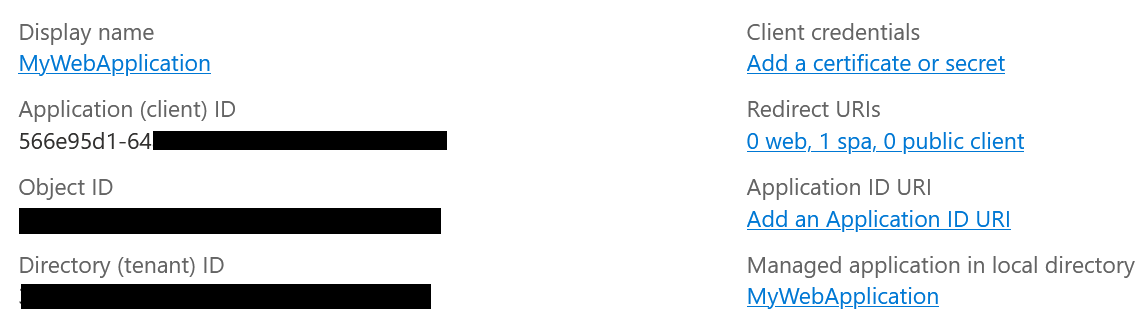
Once it’s created make sure to copy the Application (client) ID because we need it to configure our application later. We also need the Directory (tenant) ID. We’ll refer to both of these as Client ID and Tenant ID.
If we go to the Authentication tab we can see that our application is configured as a SPA, this is exactly what we want because it disables the implicit code flow and hybrid flows and allows us to use code flow with PKCE.
We also add https://jwt.ms to the Redirect URIs list so that we can test our user flow manually without having to setup the web application yet.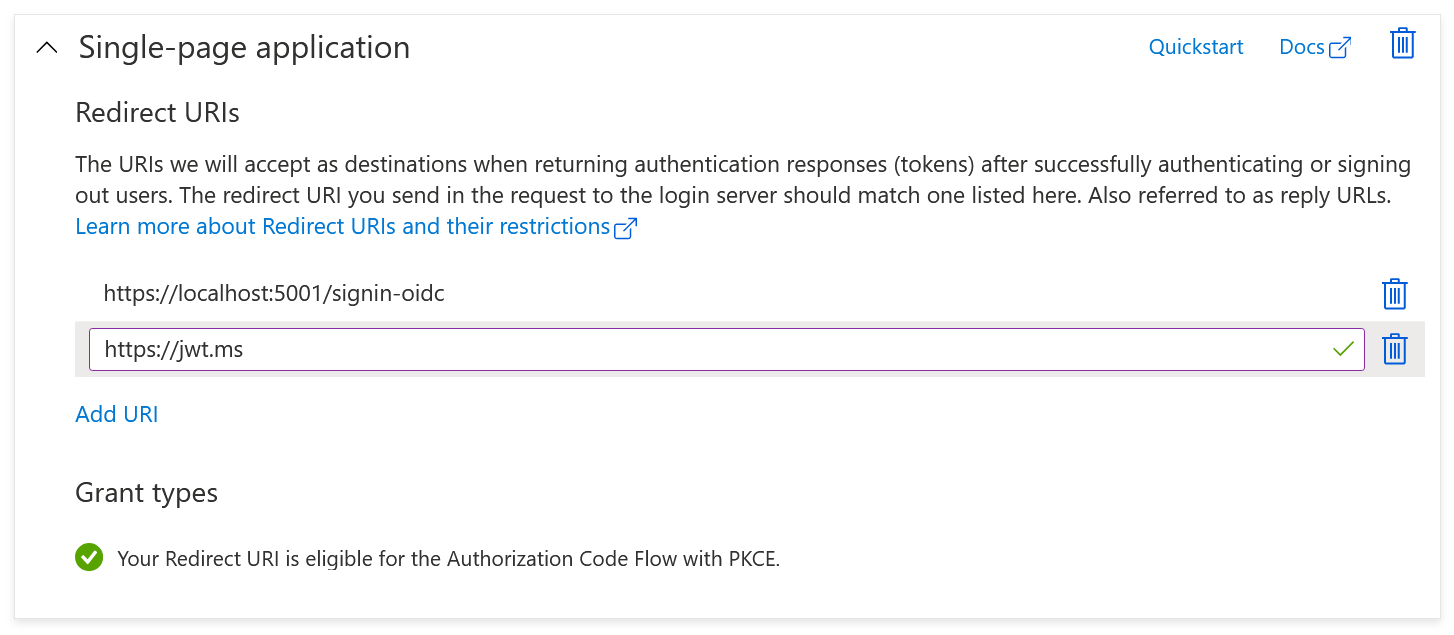
In the authorization code flow we do not get an access or id token from the authentication endpoint, instead, we get a code that can be exchanged and validated by the token endpoint to get an access token and optionally a refresh token. Which is more secure than the other authentication methods. Leave both of these unchecked.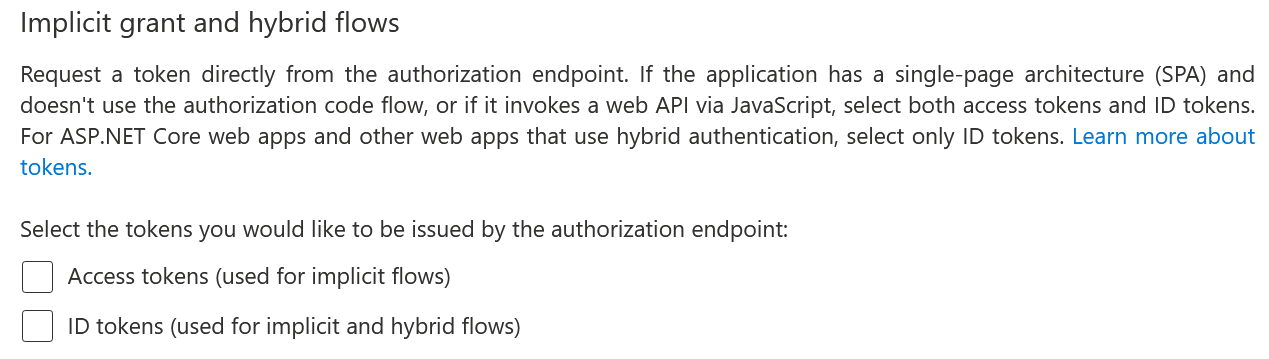
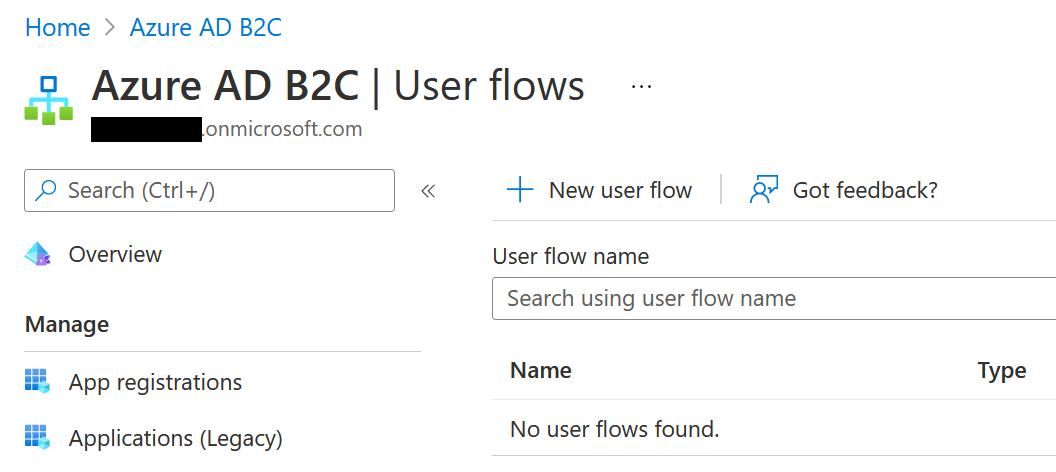
Hit Save and go one step up and find the User flows option under the Policies category.
Adding a user flow
Now that we have configured an application we should add a user flow so that our users can sign up and login to our application. If you don’t want anyone to be able to sign up to the application, select the sign up flow. Then you have to manually add your users via the Users tab. (which is also useful for adding test users)
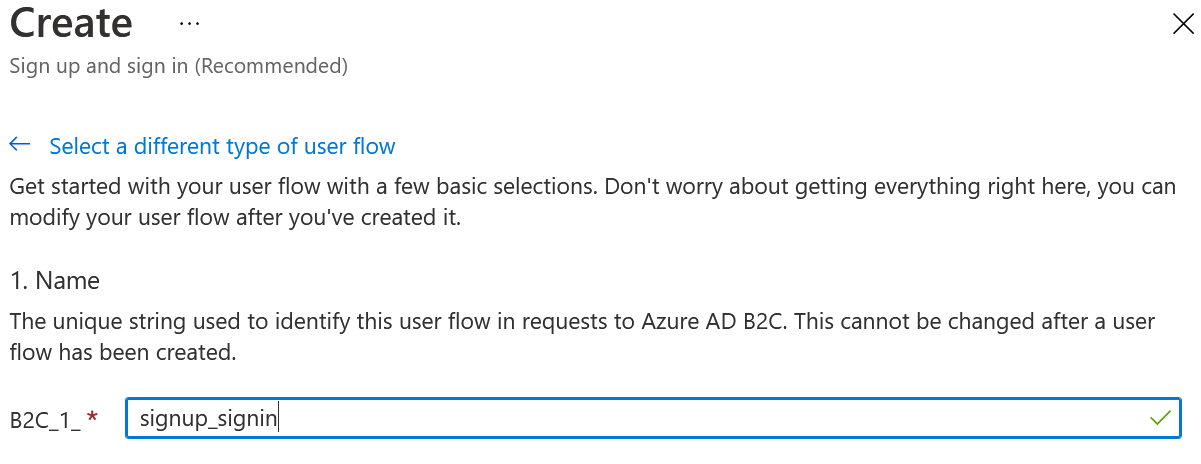
Hit the New user flow button and select Sign up and sign in.
Pick the recommended version, which is the more modern one that lets you customize the look and feel of the pages used to login and sign up.
Make sure to take a note of the full name of the user flow, I’ve named mine signup_signin so the full name would be B2C_1_signup_signin. This is the user flow that the user will be redirected to automatically when the user is required to login in to your application.
There are also options for Multifactor Authentication (MFA), I’ve just left mine to the default which is email. Just note that they’ve recently opened up multifactor authentication with an authenticator app (TOTP) as a preview feature, which is much more secure than email or SMS.
For the user attributes these are values that you want to collect during the signup process and the claims are attributes you want to return in the access token, to keep it simple we’ll collect the email address during signup because we’re gonna use it to login.

We’ll also collect the display name during signup and return it in the claim.
Getting an authorization code and using it to get an access token (optional)
This section is not strictly needed if you’re planning of securing a Razor Pages or MVC application because the app itself will handle the code flow automagically. However, for a web api you will need to get an access token to call the endpoints yourself because it doesn’t handle any of the authorization flow. But it might be useful regardless because we go through the code flow in more detail.
Go to your recently created user flow and hit the Run user flow button.
The user flow will give you a warning that when using code flow with PKCE an authorization code will be returned and not an access token or refresh token, this is exactly what we want.
If you click on the PKCE configuration we can see that it is automatically generating a code_verifier and code_challenge.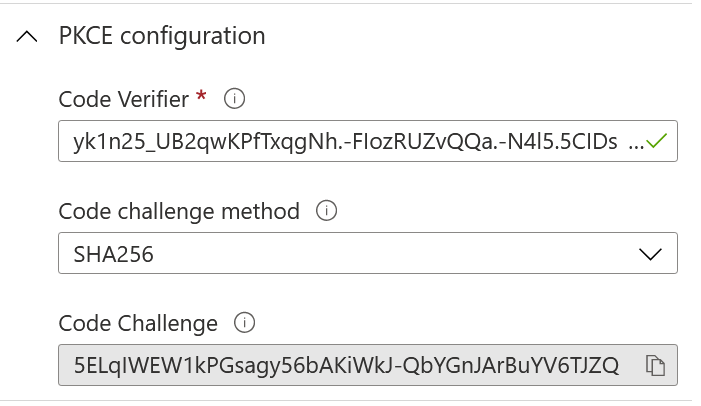
The Code Verifier (code_verifier) is a random string between 43 to 128 characters that is used to verify that it was the same client that sent the login request in the first place. The Code Challenge (code_challenge) is the SHA256 hash of the Code Verifier which is what we’ll send to request our authorization code.
This way if someone intercepts our request, they will only be able to see the code_challenge and not the code_verifier which makes it so that an attacker cannot request an access token.
Copy the url from the bottom.
And you should get an url that looks like this:
# The Code Endpoint
https://{tenant_domain_name}.b2clogin.com/{tenant_domain_name}.onmicrosoft.com/oauth2/v2.0/authorize?p=B2C_1_signup_signin&client_id=xxxxxxxx-xxxxx-xxxx-xxxx-xxxxxxxxxxx&nonce=defaultNonce&redirect_uri=https%3A%2F%2Fjwt.ms&scope=openid&response_type=code&prompt=login&code_challenge_method=S256&code_challenge=5ELqIWEW1kPGsagy56bAKiWkJ-QbYGnJArBuYV6TJZQ

# Code Verifier
yk1n25_UB2qwKPfTxqgNh.-FIozRUZvQQa.-N4l5.5CIDshloh.q35h63YaJGs2_eO52rhmq~_aC8qBz1MkHLEqUquoh23w9J_59GHGz9s..w7.lvZBXlRDfvPlp1voU
Make sure to copy the Code Verifier because we need it to verify our Code Challenge and be able to obtain an access token.
Open the url in your browser and you should be greeted with a Signup page such as this.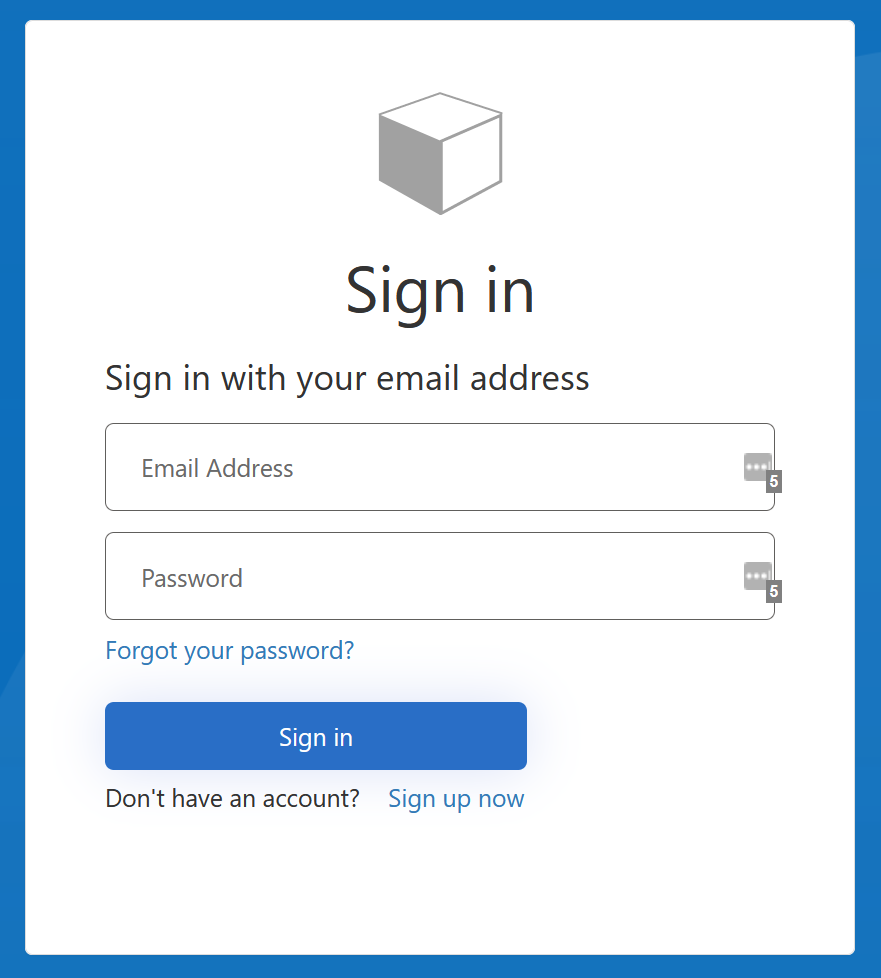
Now we can signup a new user so we can get the authorization code. Keep in mind that you will need a valid email address to register since that’s what we choose as our MFA method for the user flow.
Alternatively, you can always add test users manually in the Users tab of your Azure B2C tenant, this is what I usually do. These users do not need to verify their email either.
When signing in we will be redirected to https://jwt.ms with the auth code as part of the url query.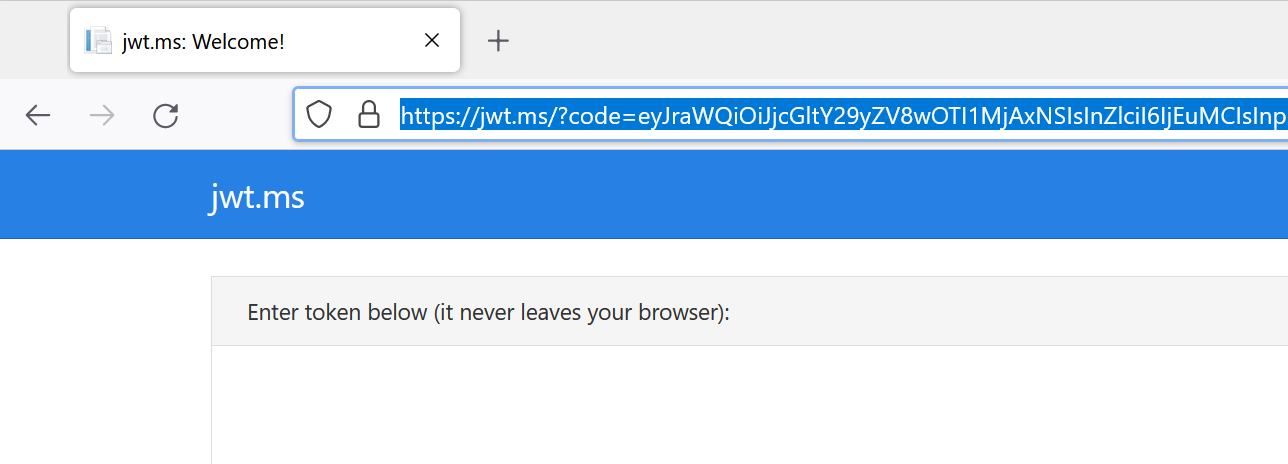
Copy the code part of the url and it should look something like this.
eyJraWQiOiJjcGltY29yZV8wOTI1MjAxNSIsInZlciI6IjEuMCIsInppcCI6IkRlZm...This is the full authorization code we need to call the token endpoint and to fetch our access token and refresh token, this code short-lived and is typically only valid for 10 minutes.
Requesting an Access Token with our authorization code
Now we can use this auth code to request an access token. The access token is the actual jwt bearer token used when authenticating with a web api for example.
https://{tenant_domain_name}.b2clogin.com/{tenant_domain_name}.onmicrosoft.com/oauth2/v2.0/token?p={user_flow}&client_id={client_id}&scope={client_id}%20offline_access&code=code&redirect_uri=https%3A%2F%2Fjwt.ms&code_verifier={code_verifier}&grant_type=authorization_codeNote that you can always grab the token endpoint url from within the application you created. “Azure AD B2C OAuth 2.0 token endpoint (v2)”
I would recommend copying the url and filling out all the query parameters in a program such as Postman.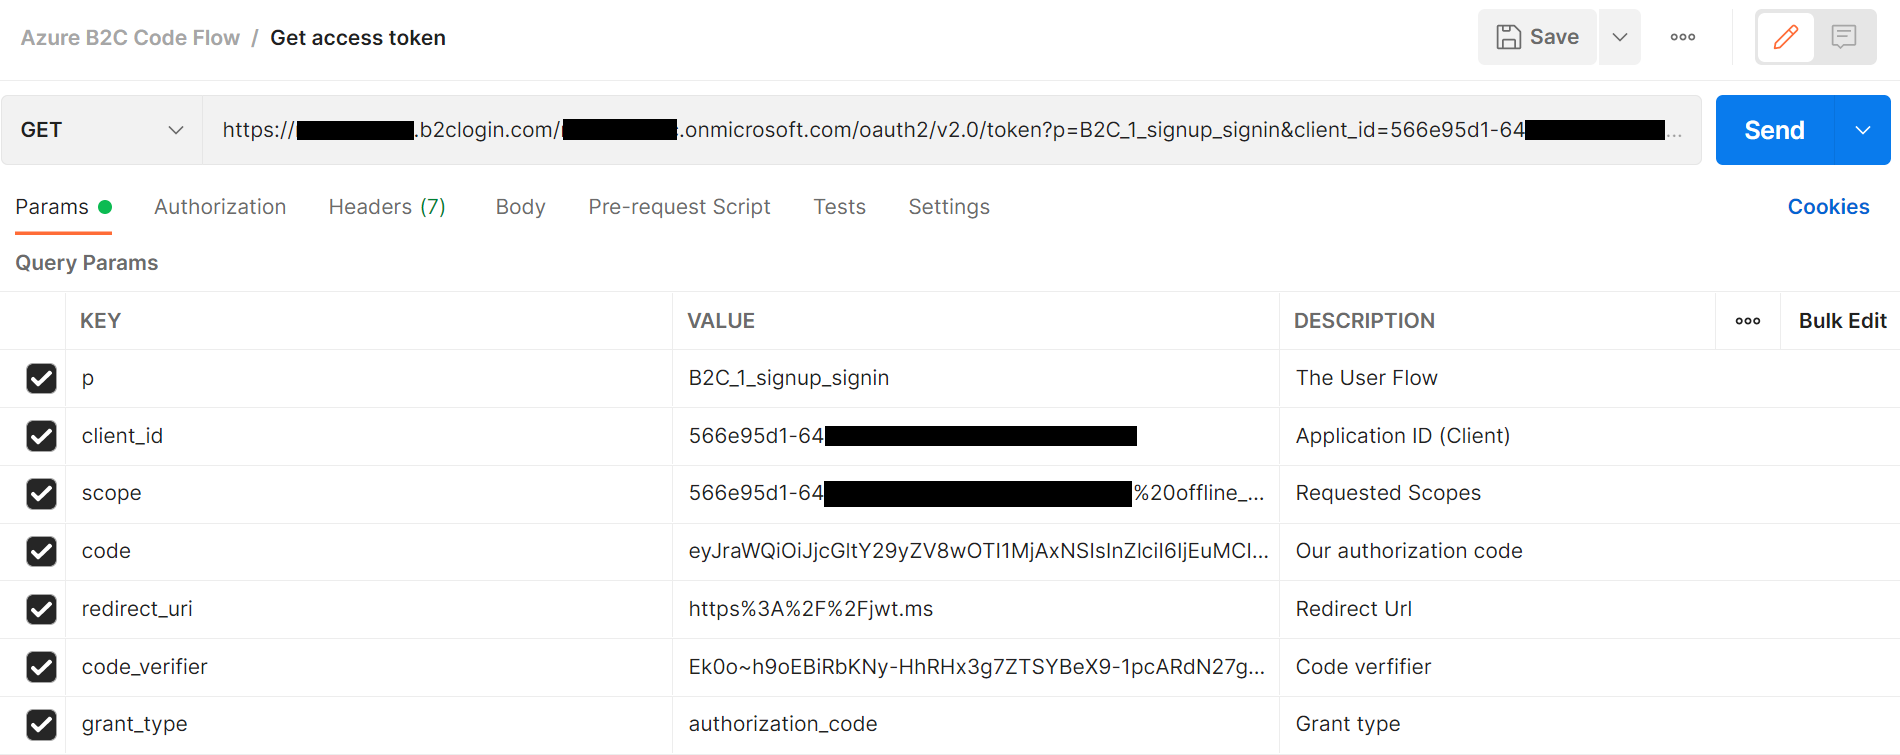
With the offline_access scope we’re also requesting a refresh token.

To inspect the token we can copy the access_token into https://jwt.ms We’re also getting an id token which includes information about the user. Since an access token and id token are short-lived (one hour for both types). We also requested a refresh token, which lasts for 24 hours, with this token we can request a new access token without having to get an authorization code first.
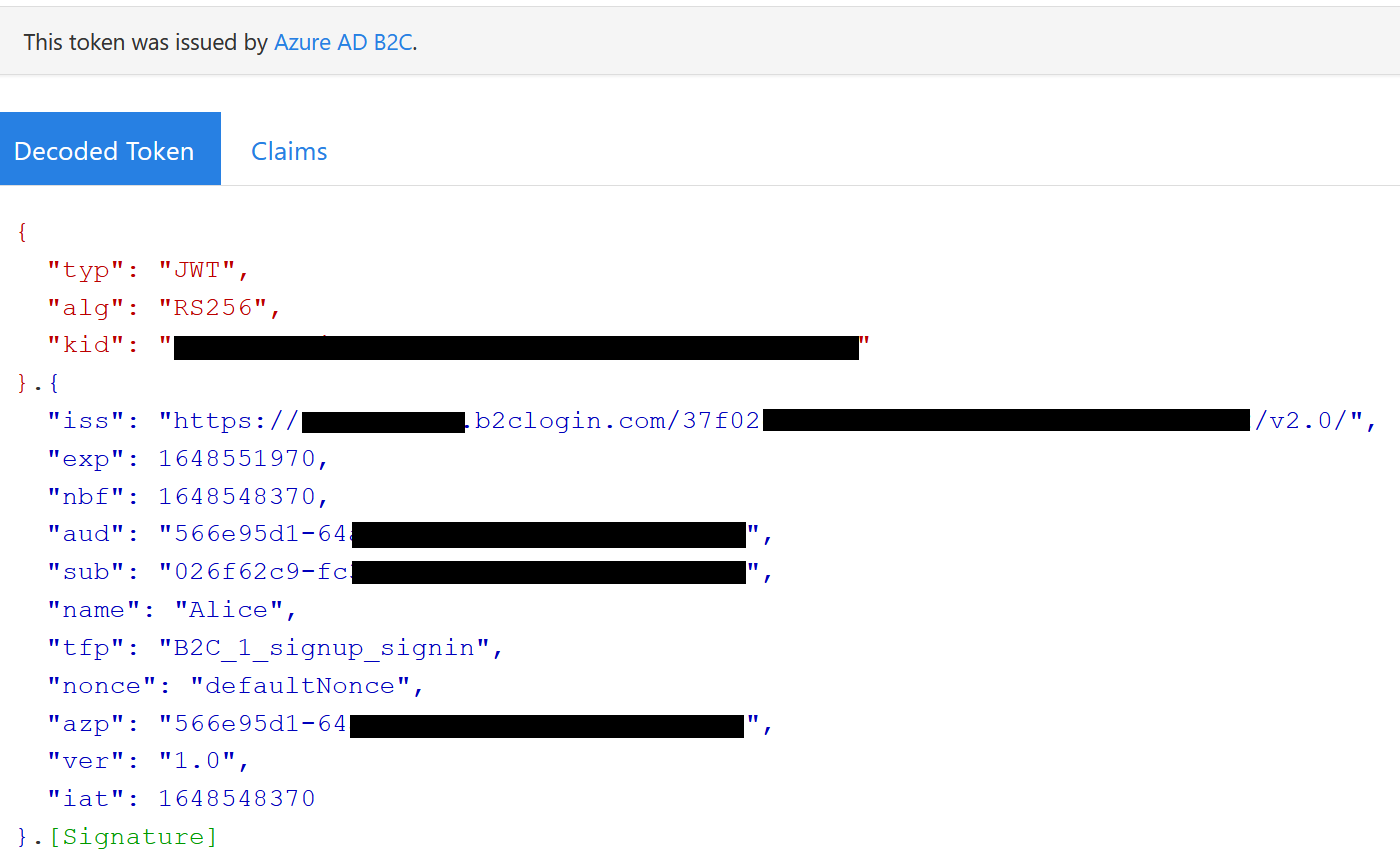
We can see the details of the jwt token and that it has been issued by our Azure B2C tenant.
Requesting a new Access Token using our Refresh Token
To get a new access token (and refresh token) we hit the token endpoint again with a few changed parameters.
https://{tenant_domain_name}.b2clogin.com/{tenant_domain_name}.onmicrosoft.com/oauth2/v2.0/token?p=B2C_1_signup_signin&client_id={application_id}&scope={application_id}%20offline_access&refresh_token={refresh_token}&grant_type=refresh_token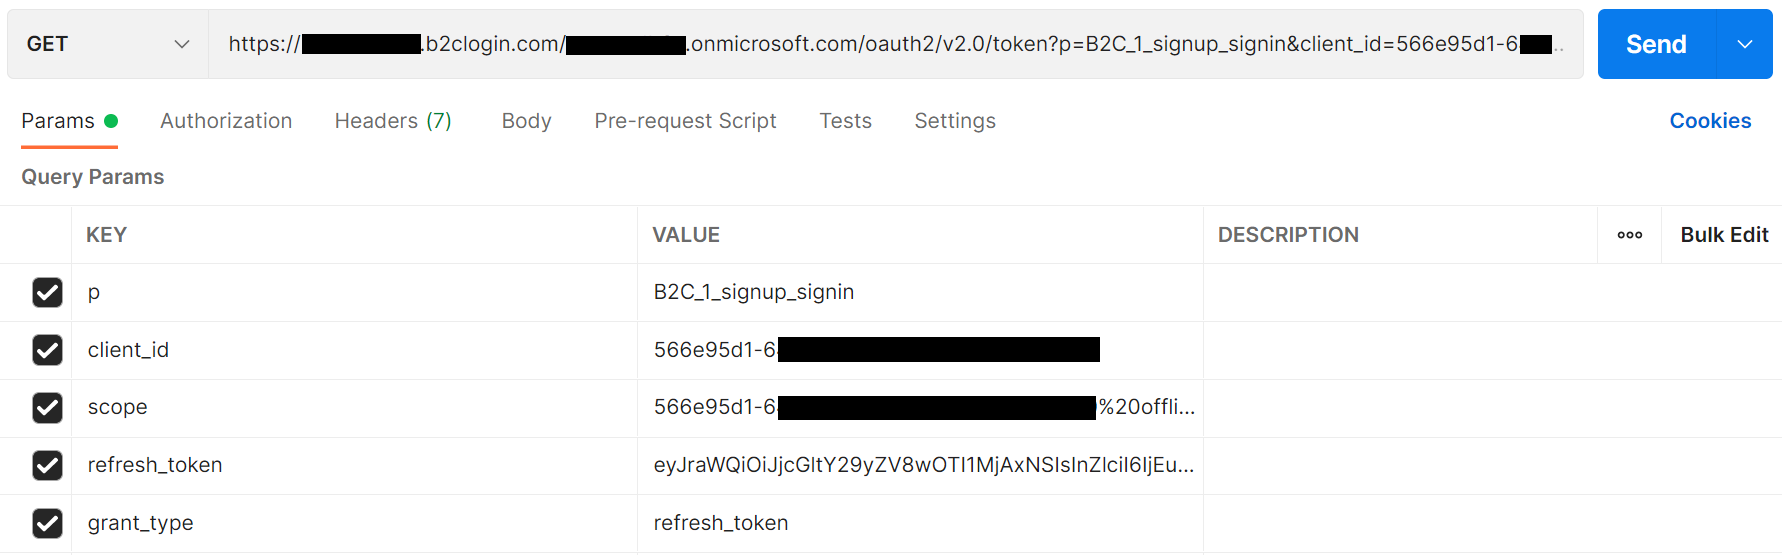
Securing a Razor Pages Application
Use the dotnet cli to create a new Razor Pages app:
dotnet new razor --auth IndividualB2C -o RazorB2CCodeFlowSampleBy specifying that auth is using the IndividualB2C option, dotnet new will automatically add packages such as the Microsoft Identity Web pages for configuring and logging in, as well as packages for handling various OpenID Connect authentication flows.
Then we need to update our appsettings.json file to match our Azure AD B2C setup.
"AzureAdB2C": {
    "Instance": "https://{tenant_domain_name}.b2clogin.com",
    "Domain": "{tenant_domain_name}.onmicrosoft.com",
    "TenantId": "xxxxxxxx-xxxx-xxxx-xxxx-xxxxxxxxxxxx",
    "ClientId": "{client_id}",
    "SignUpSignInPolicyId": "B2C_1_signup_signin",
    "CallbackPath": "/signin-oidc",
    "ResponseType": "code",
    "UsePkce": true,
    "Scope": [ "openid", "{client_id}" ]
  },
The important thing to replace here is the responseType to code, this tells ASP.NET Core to use the authorization code flow with PKCE flow for its authentication. We also need to specify openid and our client id again as scopes to be able to obtain an id token and access token. UsePkce is set to true by default when ResponseType is set to code, but it’s always good to be explicit.
Note: Don’t forget to edit the launch url of the ssl port that the application will run on, it has to match the redirect url that we setup earlier in our client application in Azure B2C. You can update the port in the Properties/launchSettings.json file.
Start the application and hit the sign in button in the top right corner. It should redirect to the B2C login page and redirect back to our application when you successfully login.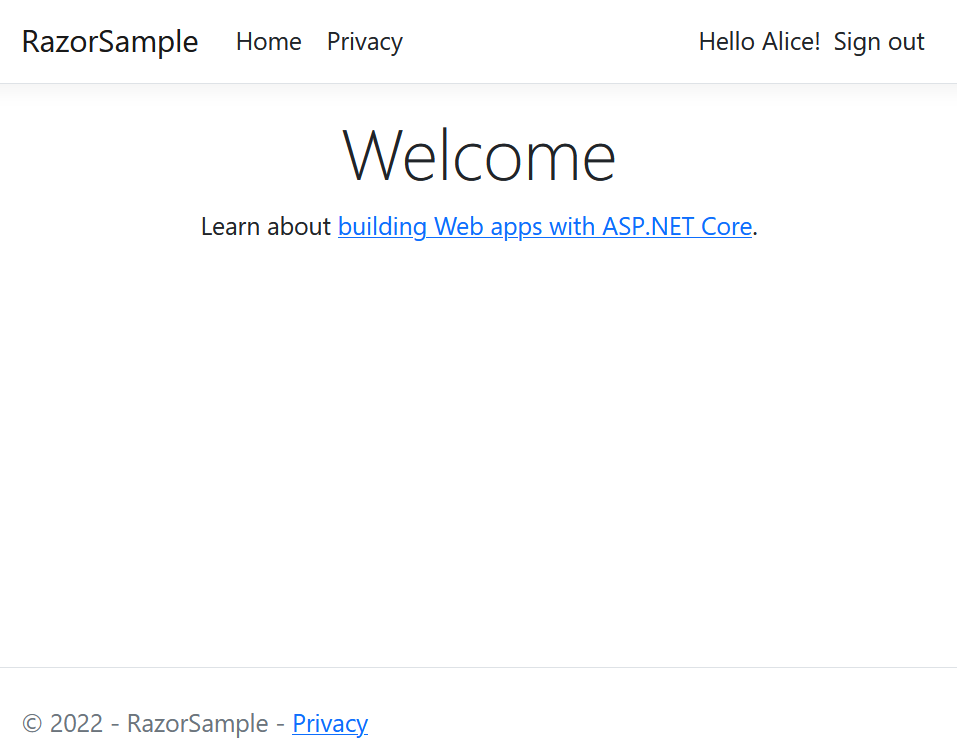
Finally we can add an [Authorize] attribute to our privacy page located at Pages/Privacy.cshtml.cs
[Authorize]
public class PrivacyModel : PageModel

...
Re-launch the application and navigate to the privacy page and it will automatically redirect to the login page and only users that are authenticated to our Azure AD B2C instance will be able to see the privacy page.
Securing a MVC Web Application
Use the dotnet cli to create a new MVC app
dotnet new mvc --auth IndividualB2C -o MVCB2CCodeFlowSampleBy specifying that auth is using the IndividualB2C option, dotnet new will automatically add packages such as the Microsoft Identity Web pages for configuring and loggin in, as well as packages for handling various OpenID Connect authentication flows.
Then we need to update our appsettings.json file to match our Azure AD B2C setup.
"AzureAdB2C": {
    "Instance": "https://{tenant_domain_name}.b2clogin.com",
    "Domain": "{tenant_domain_name}.onmicrosoft.com",
    "TenantId": "xxxxxxxx-xxxx-xxxx-xxxx-xxxxxxxxxxxx",
    "ClientId": "{client_id}",
    "SignUpSignInPolicyId": "B2C_1_signup_signin",
    "CallbackPath": "/signin-oidc",
    "ResponseType": "code",
    "UsePkce": true,
    "Scope": [ "openid", "{client_id}" ]
  },
The important thing to replace here is the responseType to code, this tells ASP.NET Core to use the authorization code flow with PKCE flow for its authentication. We also need to specify openid and our client id again as scopes to be able to obtain an id token and access token. UsePkce is set to true by default when ResponseType is set to code, but it’s always good to be explicit.
Note: Don’t forget to edit the launch url of the ssl port that the application will run on, it has to match the redirect url that we setup earlier in our client application in Azure B2C. You can update the port in the Properties/launchSettings.json file.
Start the application and hit the sign in button in the top right corner. It should redirect to the B2C login page and redirect back to our application when you successfully login.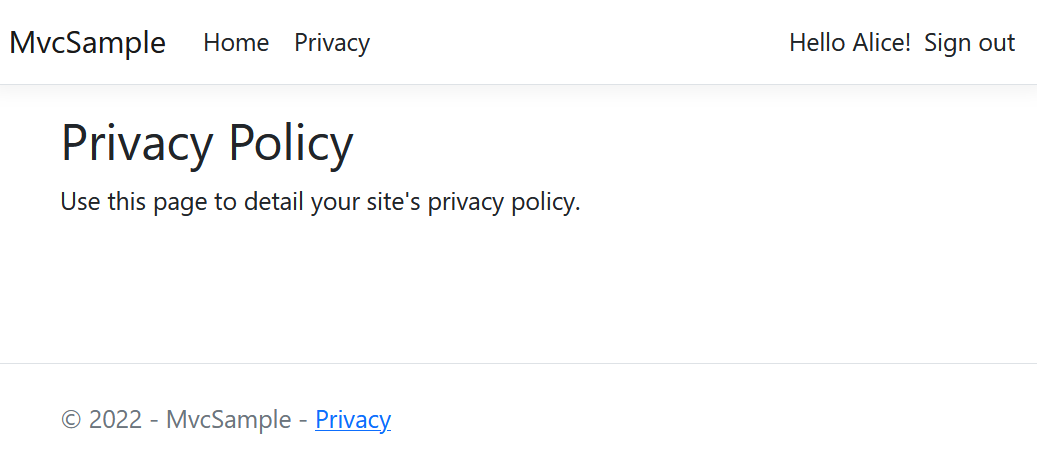
Then let’s update our HomeController.cs file so that only logged in users can view our privacy page. We do so by adding an [Authorize] attribute, if you want every action/page in the controller to require logged in users you can place the attribute above the controller instead of the method.
[Authorize] // New
public IActionResult Privacy()
{
    return View();
}
Re-launch the application and navigate to the privacy page and it will automatically redirect to the login page and only users that are authenticated to our Azure B2C instance will be able to see the privacy page.
Securing a Web Api
Create a new Web Api project
dotnet new webapi -o WebApiB2CCodeFlowSample -minimalAdd the required nuget packages
dotnet add package Microsoft.AspNetCore.Authentication.JwtBearer
dotnet add package Microsoft.Identity.Web
dotnet add package Microsoft.AspNetCore.Authentication.OpenIdConnect
Lets update our appsettings.json file with the required options.
"AzureAdB2C": {
    "Instance": "https://{tenant_domain_name}.b2clogin.com",
    "Domain": "{tenant_domain_name}.onmicrosoft.com",
    "TenantId": "xxxxxxxx-xxxx-xxxx-xxxx-xxxxxxxxxxxx",
    "ClientId": "{client_id}",
    "SignUpSignInPolicyId": "B2C_1_signup_signin",
    "Scope": [ "openid", "{client_id}" ],
    "AllowWebApiToBeAuthorizedByACL": true
},
Note that ClientId here refers to the Application Id of the app we registered in our Azure B2C tenant. Because we haven’t setup any scopes for our application and ADD B2C doesn’t return any roles in our access token you need to disable the check for these by setting AllowWebApiToBeAuthorizedByACL to true.
This will configure our application to use Azure AD B2C and bearer token authentication and authorization to secure our Web Api.
builder.Services.AddAuthentication(JwtBearerDefaults.AuthenticationScheme)
       .AddMicrosoftIdentityWebApi(builder.Configuration.GetSection("AzureAdB2C"));
builder.Services.AddAuthorization();
Make sure to add this under app.UseHttpsRedirection();
app.UseAuthentication();
app.UseAuthorization();
We’ll call the RequireAuthorization() extension method on the /weatherforecast endpoint to make sure that only users with a valid access token can call this endpoint.
app.MapGet("/weatherforecast", () =>
...
.WithName("GetWeatherForecast")
.RequireAuthorization(); // New
Calling the api with our access token
To obtain an access token refer to the Getting an authorization code and using it to get an access token (optional) section.
Using Curl (Make sure to update the port)
curl https://localhost:7231/weatherforecast -k -H "Accept: application/json" -H "Authorization: Bearer {token}"If running on Windows and WSL, launch the application in WSL instead of locally.
Using Postman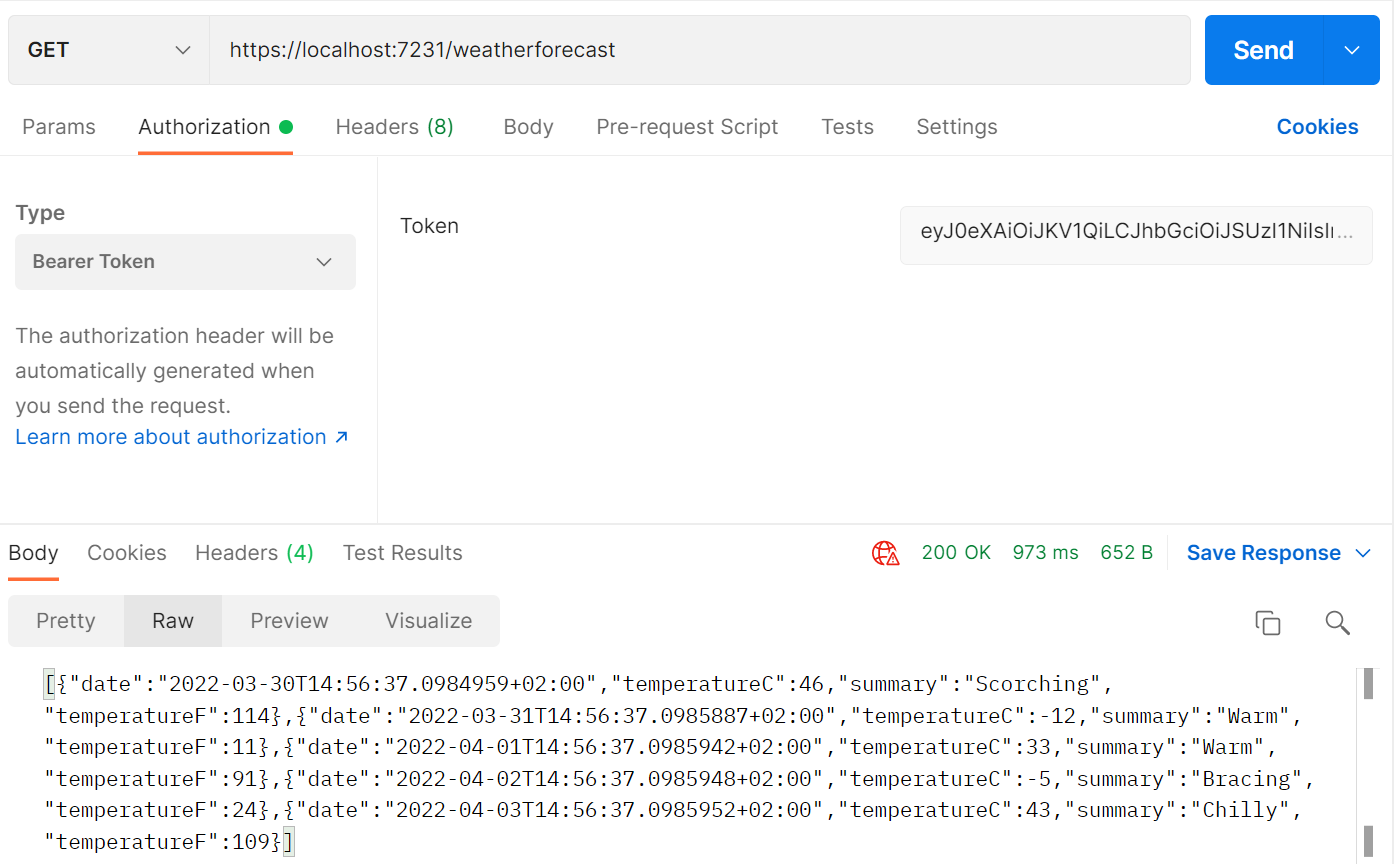
Make sure to copy a valid access token into the Bearer box.
Troubleshooting
The provided application is not configured to allow the ‘OAuth’ Implicit flow.
The ResponseType must be set to ‘code’ in the appsettings.json file."ResponseType": "code"
IDX21336: Both ‘id_token’ and ‘access_token’ should be present in OpenIdConnectProtocolValidationContext.ProtocolMessage received from Token Endpoint.
Make sure that you’re providing both the clientId and openid claims in the Scope parameters of the appsettings.json file. And make sure that the client id is correct, you can find it under the application tab in azure."Scope": [ "openid", "xxxxxxxx-xxxx-xxxx-xxxx-xxxxxxxxxxxx" ] // ClientId
I’ve uploaded code samples for each application type here so you can take a look and compare the setup if you’re having any trouble.
Thanks for reading.