Using IClaimsTransformation to add Role-Based Access Control (RBAC) to an ASP.NET Web API
.NET Core, RBAC, Security, Web API — Mar 31, 2022
You need to have created and secured an ASP.NET Web API application. The identity provider (IDP) you use is not important, many even offer built-in support for RBAC. This post is more targeted at applications that use IDP’s that do not offer RBAC support natively such as Azure AD B2C or if you wish to handle RBAC yourself.
One benefit of adding roles via a claims transformation is that the roles are not included in the JWT token that your IDP gives out to the user, which might be long-lived and makes it harder to revoke roles quickly. The drawback is that you have to handle the logic and infrastructure of handling the role assignment and administration yourself. If you want to use Azure AD B2C you can follow my previous post on Securing an ASP.NET 6 Web App with Azure AD B2C using Authorization Code Flow with PKCE but any IDP configured to secure an ASP.NET Web API is fine.
A complete sample project using Azure AD B2C as the identity provider has been uploaded to the GitHub repository WebApiRBAC.
Creating the AddRoleClaimsTransformation class
Lets create a new class that will implement the IClaimsTransformation interface. By using this interface we can add any type of claims we like to an authenticated user, which makes it perfect to add roles.
public class AddRoleClaimsTransformation : IClaimsTransformation
{
    public async Task<ClaimsPrincipal> TransformAsync(ClaimsPrincipal principal)
    {
        // User is not authenticated so just return right away
        if (principal.Identity?.IsAuthenticated is false)
        {
            return principal;
        }

        // To be able to find the roles assigned to an user we need to use an unique identifier for this person.
        // Generally the 'sub' (subject) claim can be used as an unique identifier.
        // By default the 'sub' claim is mapped by ASP.NET Core to the NameIdentifier
        var idClaim = principal.FindFirst(ClaimTypes.NameIdentifier);

        // If it is not you can try to grab it by using the 'sub' name directly.
        // var idClaim = principal.FindFirst("sub");

        if (idClaim is null)
        {
            Debug.WriteLine("Id claim missing for user.");
            return principal;
        }

        Debug.WriteLine($"Adding roles to the user: {idClaim.Value}");

        // Sample roles to attach to the user, we'll fetch this from a UserService later on.
        var roles = new List<string> { "Admin", "User" };

        // Clone the principal
        var clonedPrincipal = principal.Clone();
        var clonedIdentity = (ClaimsIdentity)clonedPrincipal.Identity;

        foreach (var role in roles)
        {
            // Here we add each role as a Role Claim type.
            clonedIdentity.AddClaim(new Claim(ClaimTypes.Role, role, ClaimValueTypes.String, "https://localhost:5001"));
        }

        return clonedPrincipal;
    }
}
We add the roles Admin and User to the principal user of every authenticated user, we also want to be able to add roles based on a unique user identity so we grab the sub claim to prepare for this.
We also need to register our IClaimsTransformation as a service so that it will be invoked during the request pipeline.
builder.Services.AddScoped<IClaimsTransformation, AddRoleClaimsTransformation>();Creating the UsersController
To test that our role claims are being added to the principal (user). Let’s create a UsersController that holds a few endpoints.
Create a new class called UsersControllers.cs and put it in the Controllers folder.
using Microsoft.AspNetCore.Authorization;
using Microsoft.AspNetCore.Mvc;
using System.Security.Claims;

[ApiController]
[Route("users")]
public class UsersController : ControllerBase
{
    // GET: https://localhost:5001/users/roles
    [Authorize]
    [HttpGet("roles")]
    public IActionResult GetRoles()
    {
        // Find all our role claims
        var claims = User.FindAll(ClaimTypes.Role);

        var items = new List<string>();

        foreach (var claim in claims)
        {
            items.Add($"Type: {claim.Type} Value: {claim.Value} Issuer: {claim.Issuer}");
        }

        // Return a list of all role claims
        return Ok(items);
    }
}
We can then do a GET request to the endpoint we just created to check if the roles are being added to the user. Don’t forget to add a valid bearer token to the Authorization header. I’m using Postman here.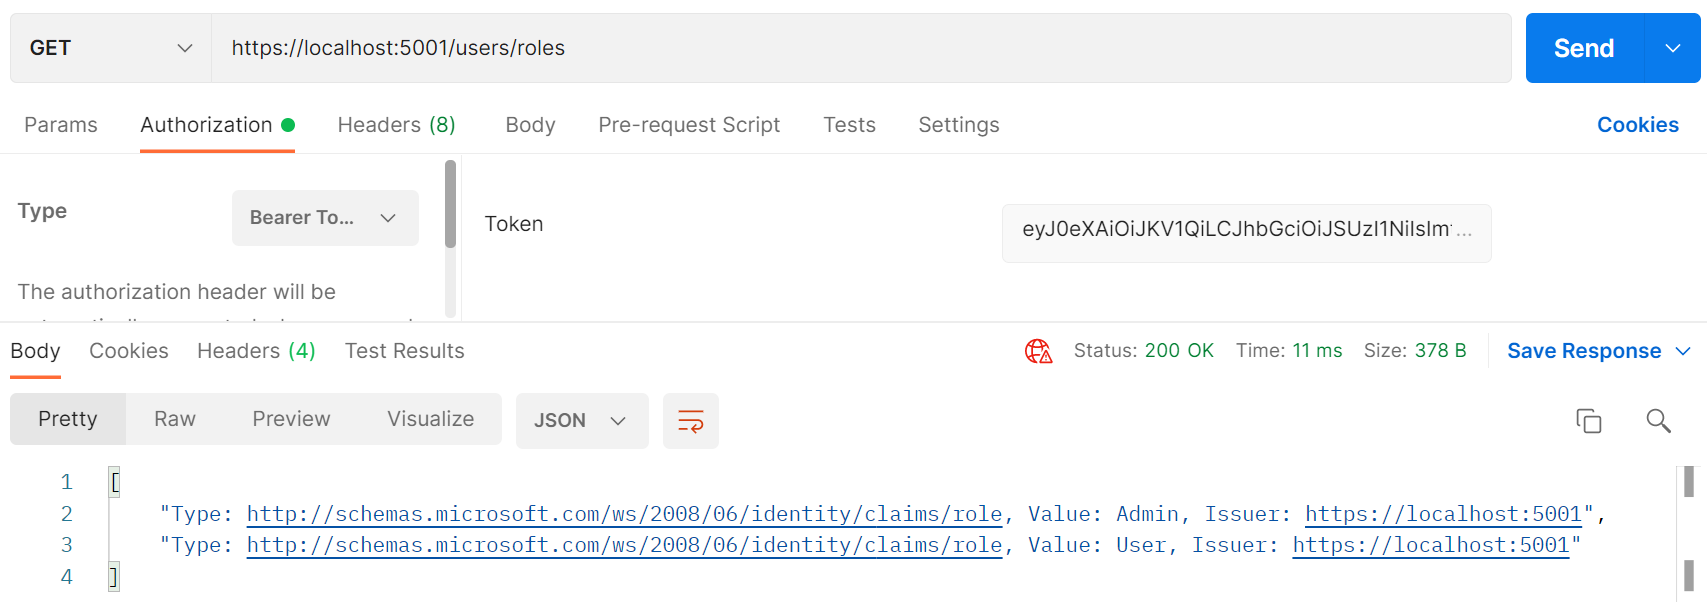
Here we can see that both the Admin and User role is added to our user.
We’ll also add another endpoint under our roles endpoint that is only available to users who have the Admin role assigned.
// GET: https://localhost:5001/users/admin
[Authorize(Roles = "Admin")]
[HttpGet("admin")]
public IActionResult AdminOnly()
{
    return Ok("Admin only here");
}
Using an IClaimsTransformation plays well ASP.NET Core’s authorization system so we can use the built-in [Authorize] attribute to limit access to an endpoint by the assigned role.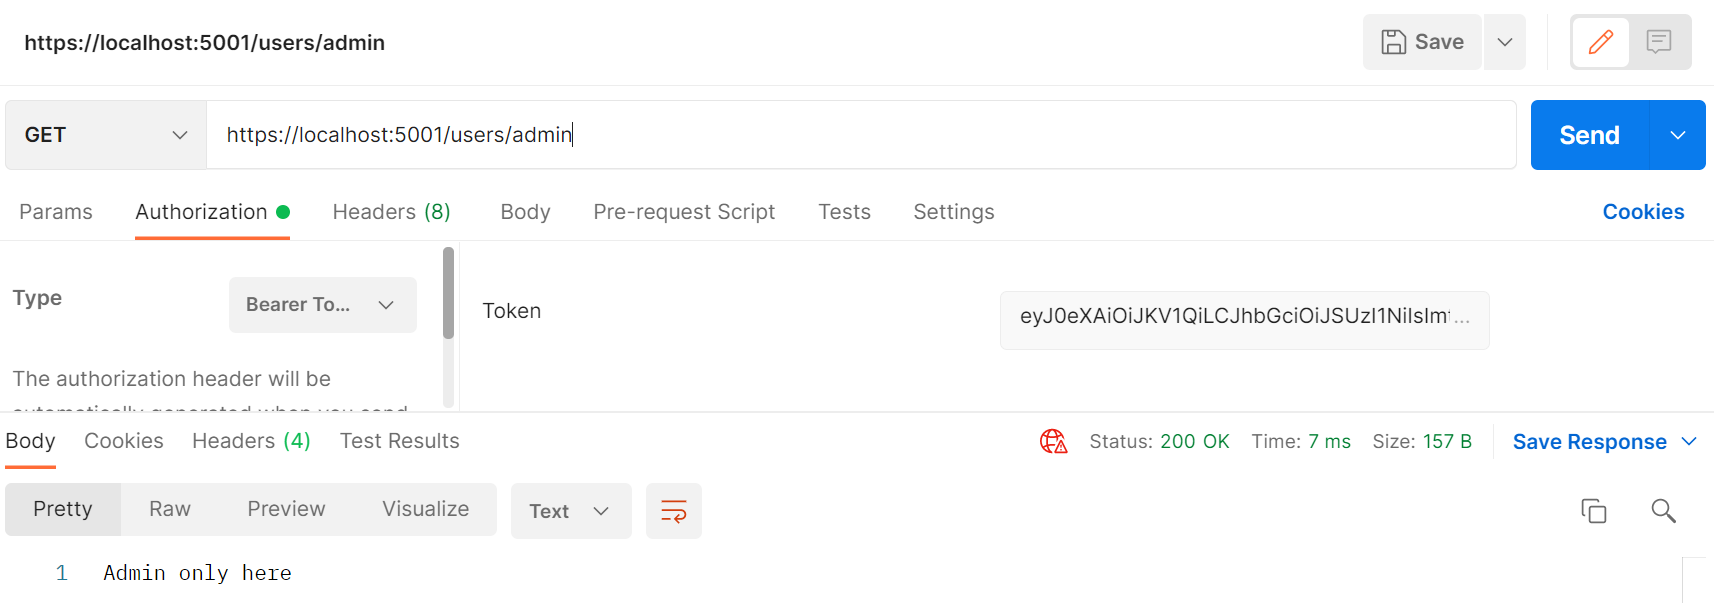
Since we assign the Admin role to all our users, the request should be successful.
Fetching roles from an UsersService
We want to be able to fetch our roles from an external persistent source, usually, this would be from a database with the use of an ORM such as Entity Framework Core or something more lightweight like Dapper. We’ll do it from an in-memory dictionary to keep the code simple.
First, we’ll setup an interface so that we can easily switch out the implemention of the UsersService.
public interface IUsersService
{
    Task<List<string>> GetRolesAsync(Guid userId);
}
Then we’ll create the implementation.
public class DictionaryUsersService : IUsersService
{
    private readonly Dictionary<Guid, List<string>> _users = new()
    {
        // Update these Guids to match users that you've added to your IDP
        { Guid.Parse("6989e9a5-0813-44bc-8c5b-e74de37450a2"), new List<string> { "Admin", "User" } }, // Alice
        { Guid.Parse("80e0a2a8-0535-4497-93f2-a4e2acebc27e"), new List<string> { "User" } },          // Bob
    };

    public async Task<List<string>> GetRolesAsync(Guid userId)
    {
        // Simulate a database hit
        await Task.Delay(1000);

        // Get the roles associated with the ID if it exists in the dictionary
        if (_users.TryGetValue(userId, out List<string> roles))
        {
            return roles;
        }

        // User not found, so just return an empty list
        return new List<string>();
    }
}
You need to update the Guids used for the users. You can find them by checking your IDP or simply by running the application while doing a request to the roles endpoint since we print out the value of the sub claim (idClaim). Here I’m using two sample users that I’ve added to my Azure AD B2C tenant.
Lastly, we need to register the class so that it can be resolved in program.cs.
builder.Services.AddScoped<IUsersService, DictionaryUsersService>(); // New
builder.Services.AddScoped<IClaimsTransformation, AddRoleClaimsTransformation>();
Extending the AddRoleClaimsTransformation with our UsersService
Then we need to update our AddRoleClaimsTransformation class to use this service.
public class AddRoleClaimsTransformation : IClaimsTransformation
{
    private readonly IUsersService _usersService;

    public AddRoleClaimsTransformation(IUsersService usersService)
    {
        _usersService = usersService ?? throw new ArgumentNullException(nameof(usersService));
    }
...
Inject the IUsersService via the constructor.
Then we need to update the TransformAsync method to use it to fetch roles from our service.
if (idClaim is null)
{
    Debug.WriteLine("Id claim missing for user.");
    return principal;
}

// New
var roles = await _usersService.GetRolesAsync(Guid.Parse(idClaim.Value));
We parse the value of the idClaim and call our usersService to fetch our roles based on the ID of the user that is logged in.
If you hit the roles endpoint with different users (bearer tokens) (in my case Alice and Bob), we can see that they are assigned different roles.
// Alice
[
    "Type: http://schemas.microsoft.com/ws/2008/06/identity/claims/role, Value: Admin, Issuer: https://localhost:5001",
    "Type: http://schemas.microsoft.com/ws/2008/06/identity/claims/role, Value: User, Issuer: https://localhost:5001"
]

// Bob
[
    "Type: http://schemas.microsoft.com/ws/2008/06/identity/claims/role, Value: User, Issuer: https://localhost:5001"
]
And if we hit the admin endpoint by using Bob’s bearer token we get a 403 Forbidden response code.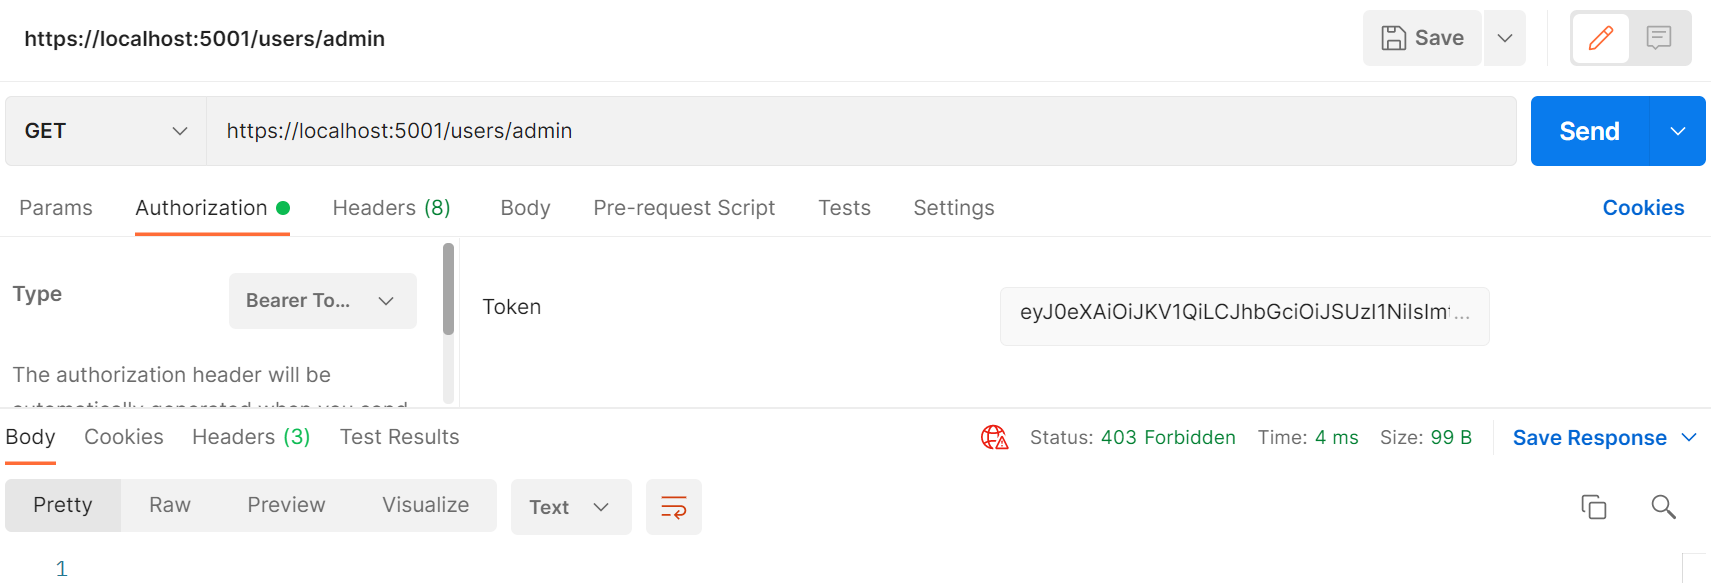
Caching our roles
The main problem with using an IClaimsTransformation and fetching the roles from the database is that we’re having to do a database hit every request that the user does just to add the roles. This adds quite a lot of overhead to each request. Because of this, we’ll use an in-memory cache to alleviate the problem.
Add an IMemoryCache via dependency injection
private readonly UsersService _usersService;
private readonly IMemoryCache _memoryCache; // New

public AddRoleClaimsTransformation(UsersService usersService, IMemoryCache memoryCache)
{
    _usersService = usersService ?? throw new ArgumentNullException(nameof(usersService));
    _memoryCache = memoryCache ?? throw new ArgumentNullException(nameof(memoryCache)); // New
}
And update program.cs to add support for the memory caching service.
builder.Services.AddMemoryCache();Then we need to update the way we fetch our roles to check the memory cache if it has the roles cached for this user already.
// The old non-cached version
// var roles = await _usersService.GetRolesAsync(Guid.Parse(idClaim.Value));

// New Cached version
var roles = await _memoryCache.GetOrCreateAsync($"{idClaim.Value}_roles", async (entry) =>
{
    // This code block is only executed if the value is not in the cache (cache miss)
    var roles = await _usersService.GetRolesAsync(Guid.Parse(idClaim.Value));

    entry.SetValue(roles);
    entry.SetSlidingExpiration(TimeSpan.FromMinutes(15));
    entry.SetAbsoluteExpiration(TimeSpan.FromHours(4));

    return roles;
});

// If we don't find any roles, just return
if (roles.Count == 0)
{
    Debug.WriteLine($"No roles found for: {idClaim.Value}");
    return principal;
}
If the cache doesn’t have the roles already in its memory (and it has not expired) then we fetch the roles from our database and set a new cache entry. If you’re running on a single server this will work well enough, but if you’re running in the cloud with multiple servers you should consider using a distributed cache such as Redis using the excellent StackExchange.Redis package. Dealing with cache invalidation is also something you need to be aware of, but is outside the scope of this post.

We can see that the first request to the api has to fetch roles from our UsersService and takes over 2 seconds to return because of the delay we added to simulate a slow call to the database.

Subsequent requests will fetch roles directly from the in-memory cache and returns much much faster.
Next steps
The next steps could be to replace the DictionaryUsersService with an implementation that calls out to a database (using something like Entity Framework Core or Dapper), as well as build out the logic to allow an admin to manage the roles for each user. You could also switch out the cache for a distributed cache such as Redis using the StackExchange.Redis package. The same approach could be used to add Attribute-Based Access Control (ABAC) also known as Policy-Based Access Control which offers more granular access control than RBAC does.
Conclusion
We’ve created a custom IClaimsTransformation that is used to add Role-Based Access Control (RBAC) support to our application by adding role claims to authenticated users. Then we’ve setup a UsersService which we then use to fetch roles based on the ID of the user. And lastly we’ve added basic caching support so that these roles are fetched from memory instead of a (slow) database call for each request.
A complete sample project using Azure AD B2C as the identity provider has been uploaded to the GitHub repository WebApiRBAC.
Thanks for reading!